Import CSV
The Import CSV functionality in the Web Console provides a user-friendly interface to upload and import CSV files into QuestDB. You can create new tables or append data to existing tables with automatic schema detection and flexible configuration options.

Accessing the Import Interface
You can access the import tab by clicking the import icon in the left-side navigation menu of the Web Console.
Import Process
Upload Queue
Once a file is added to the upload queue, the following configurations will be displayed:

Configuration Options
- File: The file name, size, and import status
- Table name: The name of the table to be created or updated. By default, this is the name of the imported file
- Schema: The column name and data type. The schema is automatically detected but can be set manually
- Write mode:
Append: Uploaded data will be appended to the end of the tableOverwrite: Uploaded data will override existing data in the table
- Actions:
Settings: Additional configuration for the importUpload: Start the uploadX: Delete the file from the upload queue
Table Schema Configuration
For Existing Tables
To update the schema of an existing table, select Overwrite write mode to replace the existing rows and partition unit with data from the CSV file.
For an existing table, changing the table name allows you to import the data as a new separate table.
For New Tables
The following settings are available for configuration:
| Setting | Description |
|---|---|
| Partition | Change the partition setting of the table |
| Designated timestamp | Selecting a designated timestamp. This is mandatory if the partition unit is not NONE |
| Data type | Define the data type. For timestamp, the timestamp format is mandatory and there is the option to select the column as the designated timestamp |
| Delete column | Click x to delete the column from the table |
| Add column | At the end of the column list, select "Add column" to insert a new column into the table |
The following table schema details are imported based on the CSV file:
- The column order
- The column name
Import Settings
The Settings panel displays the following configurations:
| Setting | Description | Default value |
|---|---|---|
| Maximum number of uncommitted rows | The size of the commit batch. A commit will be issued when this number is reached in the buffer. This setting is the same as cairo.max.uncommitted.rows. To avoid running out of memory during an import, set this value based on the RAM size of the machine | 500000 |
| Delimiter | The delimiter character to parse the CSV file | Automatic |
| Atomicity | Error behavior. Rejected rows or columns will be reported in the Details panel after the import is completed | Skip column |
| Force header | Whether to interpret the first line as the header. The result will be reported in the Details panel after the import is completed | FALSE |
| Skip line extra values | Whether the parser should ignore extra values by skipping the entire line. An extra value is something in addition to what is defined by the header | FALSE |
Import Results and Details
Status Display
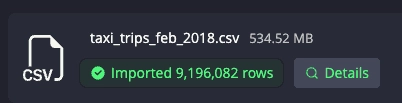
The import status is displayed in the file column. Once the action is completed, the number of rows inserted is displayed alongside the Details tab:
Details Panel
The Details panel lists rejected rows and import errors for each column:
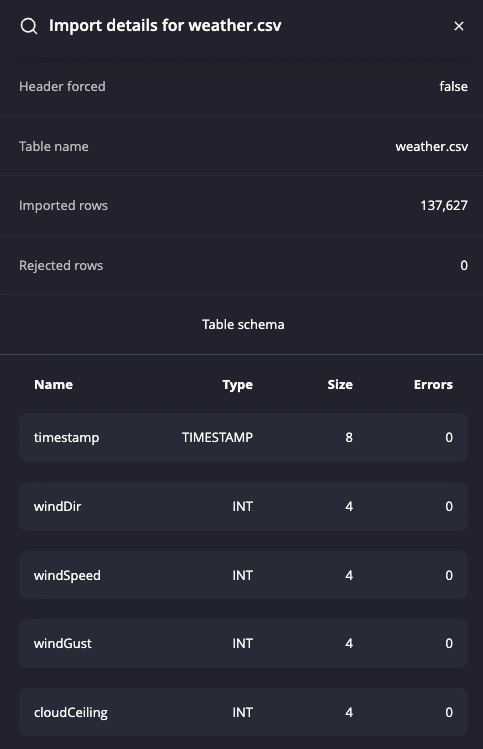
The details such as forced header, table name, and rejected rows are related to the import settings you defined. For example, setting Atomicity in Settings to "Skip row" will result in skipped rows being reported under Rejected rows after the import.